
I love Clip Art! Who doesn’t? And when I’m not using it to create a presentation at work, I often find uses for it around the house. I’ve used it to label my kid’s drawers.
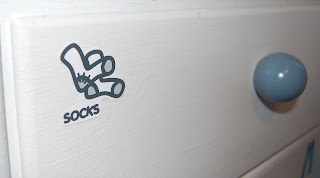 This helps my 5 year old get himself dressed in the morning and is a great learning tool for my 2 year old as well.
I’ve also made them their own clock which helps us keep on schedule everyday and avoid arguments around bedtime. The clock cannot be swayed whereas Mommy sometimes can. (to make your own just get a cheap clock, pry off the plastic top and adhere your clipart to the proper times. Put a big arrow on the hour hand for easy viewing and you’re good to go!
 I tend to get pretty particular about my clip art though. The images aren’t always exactly how I’d like them, and I learned early in my corporate career how to manipulate and customize them for my own needs.
I thought I’d pass on some of these tips and tricks so that others can use them as well. All you need is Microsoft Powerpoint and some basic computing skills. Let’s get started.
To illustrate I’m going to show you a design I came up with for last year’s Susan G Komen breast cancer walk. Some friends walk every year and wanted a fun design that they could print onto iron-on transfers and make into T-shirts, and knowing my clip art skills, they turned to me. Here is the finished design:
 And here is the clip art that I started with.
 Now before we get started let’s talk about where to get your clip art. You can get clip art many different places. You can purchase it on CD-roms, you can purchase it online from clip art sites and you can get some of it free by searching online sites. The methods that I’m going to show you in this tutorial apply only to clipart acquired from Microsoft Office. If you have Office you should have a basic set of clipart that came with the software, and you have access to an impressive supply from Microsoft online (To download images from Microsoft online, simply select the clipart and follow the download instructions based upon which version of Office you have on your computer.)
Now to get started, open Powerpoint, select a blank slide layout, and insert your image. You’ll also need to make sure that the Drawing toolbar is visible as this is what we’ll be using to edit our clipart (View/Toolbars/Drawing).
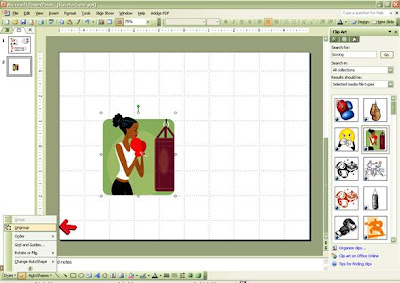 Once you have your image on your slide click on it to select it, go to you drawing toolbar, click Draw, and then ungroup. You should get a message similar to this: "This is an imported picture, not a group. Do you want to convert it to a Microsoft Office drawing object?"
 Click yes. After clicking yes, you’ll have to select Draw/Ungroup again.
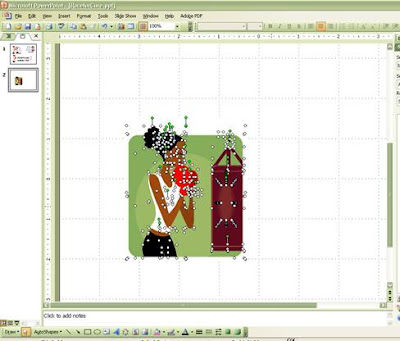
You’ll know the image is ungrouped when you see several selection circles rather than just four. The image is now separated into its pieces and is ready for manipulation.
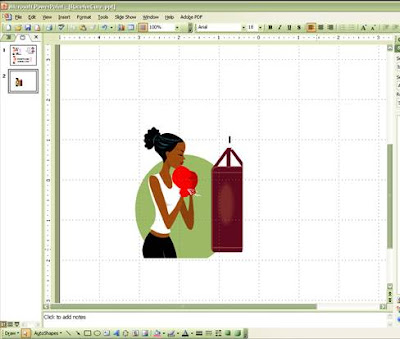
In this instance I wanted to remove the background and the punching bag completely. Click off of the image so that nothing is selected and then click back onto just the area that you want to remove. See here how the green background is selected.
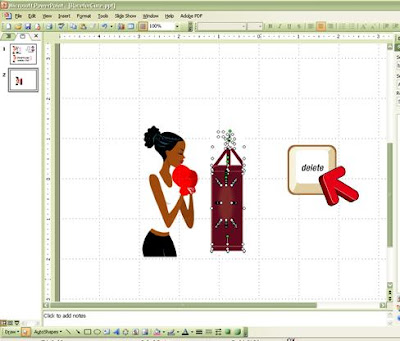
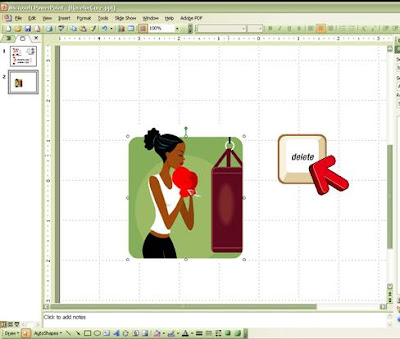 Delete it by hitting your delete button on the keyboard. The background image in this clipart is actually 2 pieces so I had to select and delete the circular area as well.
The same can be done for the punching bag. Since it has some variations in color it is actually made up of several pieces. You can click on and delete each piece individually, or click just outside of it, hold your mouse button and drag a selection box over the entire area to select all the pieces and then delete them.
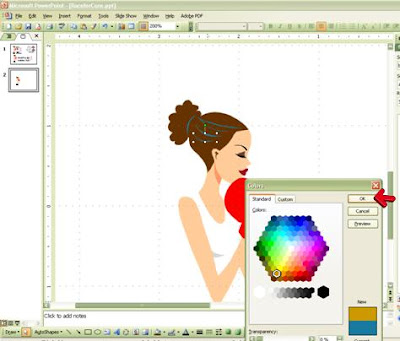
Now it was time to alter the image of the woman. While she is lovely as is, I wanted the skin and hair color of my image to more closely match those of the person for whom they were walking. To do this I selected an area of the skin and then on my drawing toolbar selected the fill color tool (the icon that looks like a bucket of paint). Click the arrow next to it and a window pops up. Choose “More fill colors . . . “ A window will pop up with all your color choices.
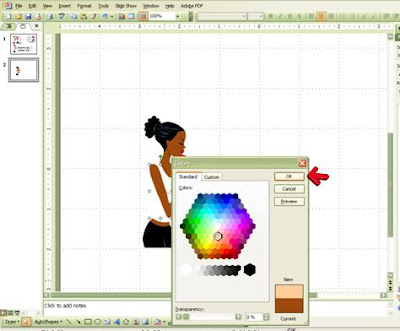 I usually find a shade I’m happy with under the Standard tab, but if you choose custom you have access to every shade imaginable. Once you’ve selected a color, choose OK and you’ll see that the piece of the clipart you’ve selected has now taken on the color you’ve chosen.
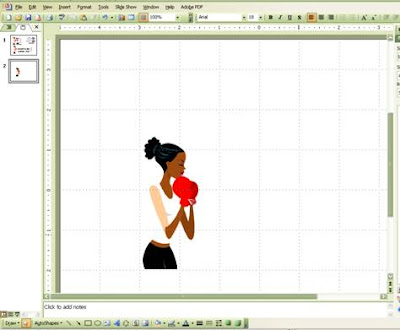 Continue this process for all areas you want to change the color of. I changed the hair color, skin tone, shirt color and boxing glove color. In most images there will be small areas of shading that are different tones and they can be a little tricky to select since they’re small but if you zoom in you can usually grab them easily and change their color.
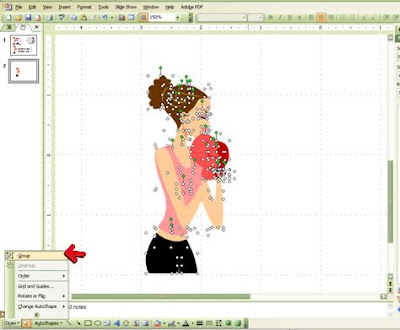
  Once you’ve made all of your changes you will now want to group your image back together. If you do not then it will be nearly impossible to move it around or resize it – you’ll just end up moving around an arm or only resizing the hair etc. To group the image, click outside of it, hold down you mouse button and drag over the entire image to select all of the pieces. Then click Draw on your drawing toolbar and Group. You can now move and resize the entire image as you see fit.
Notes and other ideas:
Some images are easier to manipulate than others. It all depends on how they are created. Images with lots of shadings and/or gradations of color can be a mess when ungrouped and can consist of hundreds of tiny pieces, making their alteration tedious if not impossible. Other images might be created in such a way as that you cannot delete one part of it without deleting another part you wish to keep. It all depends on how it’s built and how you wish to manipulate it. But I find for the most part that it’s worth trying.
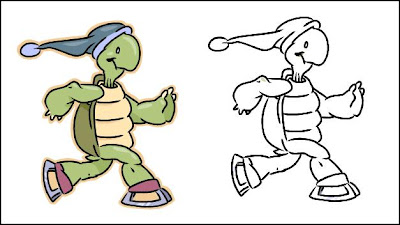 Use these techniques to create coloring pages or easily transferable embroidery patterns. Say you have a themed party or kids event and you cannot find a coloring page to suit your need. If you can find clip art that matches your theme and has a black outline then you can usually remove all of the colored areas, leaving only the black outline which you can then print and offer to your kids for a fun coloring activity. You can also use this technique to create easily transferrable hand embroidery patterns!
 This helps my 5 year old get himself dressed in the morning and is a great learning tool for my 2 year old as well.
I’ve also made them their own clock which helps us keep on schedule everyday and avoid arguments around bedtime. The clock cannot be swayed whereas Mommy sometimes can. (to make your own just get a cheap clock, pry off the plastic top and adhere your clipart to the proper times. Put a big arrow on the hour hand for easy viewing and you’re good to go!
 I tend to get pretty particular about my clip art though. The images aren’t always exactly how I’d like them, and I learned early in my corporate career how to manipulate and customize them for my own needs.
I thought I’d pass on some of these tips and tricks so that others can use them as well. All you need is Microsoft Powerpoint and some basic computing skills. Let’s get started.
To illustrate I’m going to show you a design I came up with for last year’s Susan G Komen breast cancer walk. Some friends walk every year and wanted a fun design that they could print onto iron-on transfers and make into T-shirts, and knowing my clip art skills, they turned to me. Here is the finished design:
 And here is the clip art that I started with.
 Now before we get started let’s talk about where to get your clip art. You can get clip art many different places. You can purchase it on CD-roms, you can purchase it online from clip art sites and you can get some of it free by searching online sites. The methods that I’m going to show you in this tutorial apply only to clipart acquired from Microsoft Office. If you have Office you should have a basic set of clipart that came with the software, and you have access to an impressive supply from Microsoft online (To download images from Microsoft online, simply select the clipart and follow the download instructions based upon which version of Office you have on your computer.)
Now to get started, open Powerpoint, select a blank slide layout, and insert your image. You’ll also need to make sure that the Drawing toolbar is visible as this is what we’ll be using to edit our clipart (View/Toolbars/Drawing).
 Once you have your image on your slide click on it to select it, go to you drawing toolbar, click Draw, and then ungroup. You should get a message similar to this: "This is an imported picture, not a group. Do you want to convert it to a Microsoft Office drawing object?"
 Click yes. After clicking yes, you’ll have to select Draw/Ungroup again.
You’ll know the image is ungrouped when you see several selection circles rather than just four. The image is now separated into its pieces and is ready for manipulation.
In this instance I wanted to remove the background and the punching bag completely. Click off of the image so that nothing is selected and then click back onto just the area that you want to remove. See here how the green background is selected.
 Delete it by hitting your delete button on the keyboard. The background image in this clipart is actually 2 pieces so I had to select and delete the circular area as well.
The same can be done for the punching bag. Since it has some variations in color it is actually made up of several pieces. You can click on and delete each piece individually, or click just outside of it, hold your mouse button and drag a selection box over the entire area to select all the pieces and then delete them.

Now it was time to alter the image of the woman. While she is lovely as is, I wanted the skin and hair color of my image to more closely match those of the person for whom they were walking. To do this I selected an area of the skin and then on my drawing toolbar selected the fill color tool (the icon that looks like a bucket of paint). Click the arrow next to it and a window pops up. Choose “More fill colors . . . “ A window will pop up with all your color choices.
 I usually find a shade I’m happy with under the Standard tab, but if you choose custom you have access to every shade imaginable. Once you’ve selected a color, choose OK and you’ll see that the piece of the clipart you’ve selected has now taken on the color you’ve chosen.
  Continue this process for all areas you want to change the color of. I changed the hair color, skin tone, shirt color and boxing glove color. In most images there will be small areas of shading that are different tones and they can be a little tricky to select since they’re small but if you zoom in you can usually grab them easily and change their color.
  Once you’ve made all of your changes you will now want to group your image back together. If you do not then it will be nearly impossible to move it around or resize it – you’ll just end up moving around an arm or only resizing the hair etc. To group the image, click outside of it, hold down you mouse button and drag over the entire image to select all of the pieces. Then click Draw on your drawing toolbar and Group. You can now move and resize the entire image as you see fit.
Notes and other ideas:
Some images are easier to manipulate than others. It all depends on how they are created. Images with lots of shadings and/or gradations of color can be a mess when ungrouped and can consist of hundreds of tiny pieces, making their alteration tedious if not impossible. Other images might be created in such a way as that you cannot delete one part of it without deleting another part you wish to keep. It all depends on how it’s built and how you wish to manipulate it. But I find for the most part that it’s worth trying.
 Use these techniques to create coloring pages or easily transferable embroidery patterns. Say you have a themed party or kids event and you cannot find a coloring page to suit your need. If you can find clip art that matches your theme and has a black outline then you can usually remove all of the colored areas, leaving only the black outline which you can then print and offer to your kids for a fun coloring activity. You can also use this technique to create easily transferrable hand embroidery patterns!
Sometimes these techniques work and sometimes they don't. It depends upon the clipart and sometimes the version of Office that you are using. Anyone who knows Microsoft knows how finicky it can sometimes be. I certainly do not claim to be a Microsoft expert but feel free to email me if you have any questions or issues and I'll do my best to help you out. pinandpaper@qmail.com


