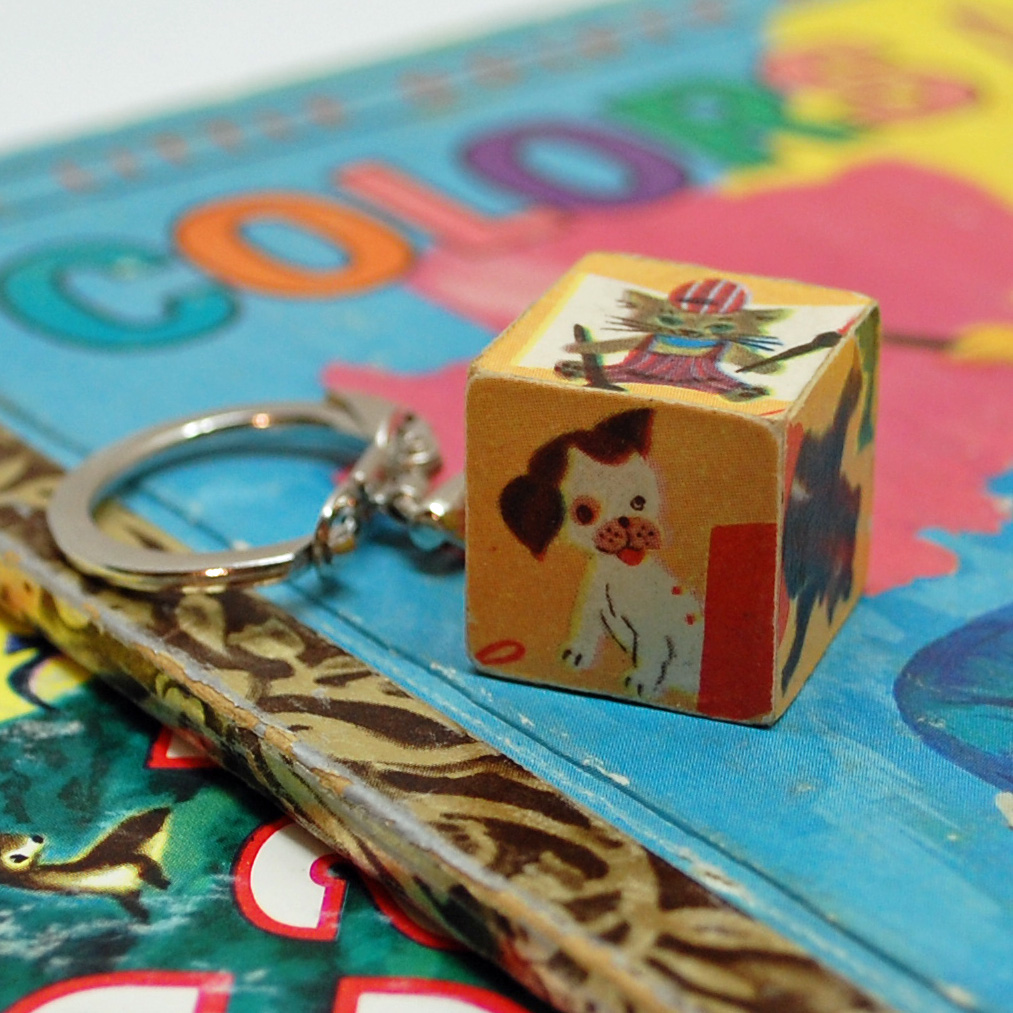
Guess who's got a new item in her Etsy shop??
No, really, guess . . .
I'm waiting . . .
Okay, fine - some people like guessing games you know. . . but obviously you're not one of them so I'll just go ahead and tell you.
It's me!
I've actually got 5 new items in the shop. Granted, they're all variations of the same product but hey, progress has been made!
I think they're adorable and would be a perfect gift for a soon to be mom or someone who just really likes animals that wear hats, or shirts with no pants, or overalls with no shirts - what the hell?!
Really I'd like to think that anyone who enjoys vintage children's book illustrations would like one of these cute little keychains.
I'm glad I finally found a use for some of the older vintage books I've picked up at garage sales and flea markets. These weren't in the best of shape but since the images are small I was able to rescue and preserve some of them on these little wooden cubes.
Click my Etsy link on the side to check them out in the shop if you'd like.
Wednesday, January 23, 2013
Wednesday, January 2, 2013
DIY jewelry displays
The majority of my recent crafty DIY projects have centered around spicing up the bedroom . . . .no, I haven't been knitting wool bustiers (itchy). I mean spicing it up interior design wise.
I determined that I wanted my jewelry on display instead of hidden away in my jewelry case. I find that when it's visible it gets worn a lot often, plus it seems a shame to keep things that I find so attractive and sentimental inside a drawer.
I started by displaying my necklaces. This was as simple as screwing some cup hooks into the bottom of an already existing shelf.
Then it was on to my favorite things - my rings. I have a recent obsession with what my friends like to call "big ass rings" and I needed somewhere to display them. I solved that problem with some frames and felt:
Here's a quick how to in case anyone is interested.
I started with some fabulous IKEA frames - of course you can use whatever frames you have available.
I had to remove their backs and the glass (which was actually plastic). Then I got out my stash of felt and started rolling up some tampons. Or at least that's what they started looking like to me. I had to do some experimentation to determine how much felt was needed for each roll. My white felt was quite thick (super absorbency) and I only needed about 5 inches in length. The width was about 1 inch longer than the width of my frame opening.
I used a line of hot glue to hold my roll together.
This is when things got really high tech! I couldn't use the original back of my frame as it wouldn't accomodate the thickness of my felt, so I used the handyman's greatest tool - duct tape. It looks classy though because I got the white duct tape to match my frame!!
It worked quite well. I used some command strips to hold this one to the wall and it's been 4 months and it hasn't fallen apart yet so I'm calling that a success!
I used a nice burnt orange felt on my other frame. It wasn't as thick as the white so I ended up rolling up about 7 inches instead of 5, but aside from that everything else was the same.
I wanted this one to stand on my shelf so I used my duct tape and some really sturdy cardboard to create a stand on the back.
Hope you can use some of these techniques to create your own jewelry displays.
I determined that I wanted my jewelry on display instead of hidden away in my jewelry case. I find that when it's visible it gets worn a lot often, plus it seems a shame to keep things that I find so attractive and sentimental inside a drawer.
I started by displaying my necklaces. This was as simple as screwing some cup hooks into the bottom of an already existing shelf.
Then I took an old photo frame, replaced the backing with a piece of foam core, wrapped it with a layer of quilt batting and white fabric and made my own mini pin board for my brooches.
Then it was on to my favorite things - my rings. I have a recent obsession with what my friends like to call "big ass rings" and I needed somewhere to display them. I solved that problem with some frames and felt:
Here's a quick how to in case anyone is interested.
I started with some fabulous IKEA frames - of course you can use whatever frames you have available.
I had to remove their backs and the glass (which was actually plastic). Then I got out my stash of felt and started rolling up some tampons. Or at least that's what they started looking like to me. I had to do some experimentation to determine how much felt was needed for each roll. My white felt was quite thick (super absorbency) and I only needed about 5 inches in length. The width was about 1 inch longer than the width of my frame opening.
I used a line of hot glue to hold my roll together.
When I had enough I hot glued them to a piece of cardboard sligtly larger than my frame opening. Be sure to hot glue them securely and as tight together as possible.
I used a nice burnt orange felt on my other frame. It wasn't as thick as the white so I ended up rolling up about 7 inches instead of 5, but aside from that everything else was the same.
I wanted this one to stand on my shelf so I used my duct tape and some really sturdy cardboard to create a stand on the back.
Thursday, November 8, 2012
Pinthetic? Bookends as floating bookshelves
I recently switched bedrooms with my children and so I've been spending some time redecorating it with Pinterest inspired projects. One of these projects was this floating book, bookshelf idea.
Here's the original pin:
Now the original pin didn't have any instructions, but it seemed simple enough. Get a metal bookend, screw it to the wall, add books and Bob's your uncle you're rocking out some sweet floating bookshelves right? Well not quite. But I got it accomplished:
When I started planning on actually putting it together I asked myself, "How the hell is the bottom cover of that book attached to the bookend Also, as a sad consequence of the current state of our economy, the local Bookends R Us store went out of business so I couldn't even find a bookend that would work for this project.
I'm sure maybe I could have found something online but I have no patience so I just went to my local hardware store and found the thinnest metal brace I could find. This was from the decking section and is intended to secure the posts to the frame or something along those lines. It was around $4.
I also got some small screws (about 1/2 inch long) and a lovely hard cover book from the dollar store. I had come up with several scenarios as to how to possibly attach the book to the bracket so that it wouldn't be permanent, but they all just seemed too complex. I also contemplated just using some double sided tape or other semi-removable adhesive so that the bottom book could be removed, but since I knew I'd have other books stacked on top of it, I really wanted that bottom book securely fastened to the brace.
So if you attempt this project just bite the bullet and find some cheap book you don't care about, but like the cover of. I removed the dust jacket, marked the center of the cover and just screwed the bracket directly into the book. My screws went through the cover and a little bit into the pages to make it nice and secure.
Now all you need to do is slip the dust jacket back on to your book. Mark and cut out a section from the back flap and then pry up the edges of the pages and slide it back in. This covers up your bracket and screws.
Then it's just a matter of screwing your bracket to the wall, adding your books and topping it with a gnome or two. It's a requirement people, everything is better with gnomes!
Not bad eh?
Wednesday, October 24, 2012
Stop the presses! New item in the shop!
There is reason to celebrate folks - I've finally completed a project and have listed it in the shop. It's been a pretty long dry spell but it's finally been broken.
Here's the crocheted blanket I hinted about a couple posts ago:
You can check it out in the shop here.
Tuesday, October 9, 2012
Pinthetic?
I think the only thing more popular these days than Pinterest is the number of blogs about Pinterest projects gone awry.
I'm shamelessly jumping on this bandwagon because unfortunately I spend a lot of time on Pinterest. I wish I didn't, but then again I wish I didn't have to suck in my gut and lay flat on the bed every time I put on my favorite jeans either. However I'm finding my willpower is just as weak when it comes to sweet DIY pins, as it is when a Little Debbie snack is within arm's reach. . . . Anyway, my point is that I might as well make something productive out of all those wasted hours online - and why not turn my inevitable Pinterest project failures (or maybe even a rare success) into blog content?
That being said, today I'm launching my first Pinterest project blog post - aptly named: "Pinthetic?" (because I like to try and be clever - and "Pintastrophe" was already taken).
Let's start with my Pinterest inspiration:
What do you think? How Pinthetic is it?
I'm shamelessly jumping on this bandwagon because unfortunately I spend a lot of time on Pinterest. I wish I didn't, but then again I wish I didn't have to suck in my gut and lay flat on the bed every time I put on my favorite jeans either. However I'm finding my willpower is just as weak when it comes to sweet DIY pins, as it is when a Little Debbie snack is within arm's reach. . . . Anyway, my point is that I might as well make something productive out of all those wasted hours online - and why not turn my inevitable Pinterest project failures (or maybe even a rare success) into blog content?
That being said, today I'm launching my first Pinterest project blog post - aptly named: "Pinthetic?" (because I like to try and be clever - and "Pintastrophe" was already taken).
Let's start with my Pinterest inspiration:
Just look at this spooky eyeball wreath! Perfect for Halloween right? I thought it was a great mixture of scary and gross and whimsical. I couldn't wait to put one together and hang it on my front door.
When I found plastice eyeballs at the Dollar Tree I knew that me and this wreath were meant to be. I got my eyeballs, my glue gun, my grapevine wreath that I had spray painted black and I got . . . this:
It's not horrible right? I mean it kind of looks like the original. My eyeballs were smaller than hers, plus they didn't have the cool red veins and stuff on them that really made the original pop. Oh, and you see those gaps here and there. Yeah, that's where my eyeballs popped off after the hot glue had dried and the cat batted them underneath the furniture and I just didn't have the energy to try and find them.
The original Pin showed the wreath hanging in front of a distressed window with chicken wire in it. Now if Pinterest has taught me anything it's that everything looks better hanging in front of distressed wood and chicken wire. See below:
without distressed wood and chicken wire:
with distressed wood and chicken wire:
But unfortunately I didn't have any distressed wood or chicken wire lying around. I tried hanging it on my front door but it just looked really kind of sad. Like some mentally challenged (oh sorry, it's "Intelectually Disabled" now) person had ranomly glued ping pong balls on a wreath. So I ended up hanging it on the garage - which nobody can see from the street. It's my eyeball wreath of shame.
What do you think? How Pinthetic is it?
Monday, September 24, 2012
What the Hell?
I've been slightly absent from this blog for a little bit (I have a flair for stating the obvious, I know). I have plenty of good excuses: I moved out of my house, moved back into my house, got a different job, freaked out about possible breast cancer which turned out to be just a lumpy tit, and started taking mood enhancing drugs. For full details you'll have to wait until my autobiography is published (dont' hold your breath).
But it's all water under the bridge my friends, because I'm back . . . typing . . . about stuff. Okay, I've got things to say, really I do. I mean I don't want you to think that during my blog absence I wasn't doing anything crafty. I mean, I pinned a hell of a lot of shit on Pinterest. My 'pin it' button was on fire people!
What? That doesn't count?
Ummm, I found some pretty freaky crafts in my Mom's house:
I had nightmares for weeks afterwards.
But it's all water under the bridge my friends, because I'm back . . . typing . . . about stuff. Okay, I've got things to say, really I do. I mean I don't want you to think that during my blog absence I wasn't doing anything crafty. I mean, I pinned a hell of a lot of shit on Pinterest. My 'pin it' button was on fire people!
What? That doesn't count?
Ummm, I found some pretty freaky crafts in my Mom's house:
I had nightmares for weeks afterwards.
![]() |
| No, NO!! She's trying to suffocate me with those pom pom hands!!! |
ahem . . . I've also been working on a fabulous crocheted blanket. My son said to me one day, "Mom, are you going to be working on that for the rest of your life?" It felt like it, it really did, but it's almost finished and hopefully will be in the shop soon.
I've got some plans for new stuff for the shop, that may or may not reach fruition. It's hard to tell with me. And I'm also making it my mission to actually do some of the crafts I've pinned on Pinterest and I'll be sharing the success (or more than likely, failures) of those here on this blog.
So to sum things up: Sorry I was gone. I'm back. I don't promise anything spectacular but with the help of prescribed medication, I shall do my best!
Thursday, May 3, 2012
It was like being embraced by the entirety of Scandinavia
Recently I visited my mom in Phoenix and of course we made a trip to IKEA. I adore IKEA. If anyone has a petition going to get an IKEA into Iowa I will sign it. . . and then legally change my name and sign it again! I suppose I could start a petition myself but hey, I'm busy.
Anywho, as we're strolling through the store checking out all the Lerbergs's and Ekby's and Byholma's, we entered one of the little mini house/apartment displays they have set up within the store. If you've never been to IKEA, they usually have several small display "homes" which showcase what the economy and functionality of their furniure can accomplish in tight quarters.
As I entered the bedroom of the 380 sq. foot display, something on the wall caught my eye.
Hmmm, that silhouette on the right looks familiar....Let's take a closer look
No, it can't be!
Yes, yes it is!
Anywho, as we're strolling through the store checking out all the Lerbergs's and Ekby's and Byholma's, we entered one of the little mini house/apartment displays they have set up within the store. If you've never been to IKEA, they usually have several small display "homes" which showcase what the economy and functionality of their furniure can accomplish in tight quarters.
As I entered the bedroom of the 380 sq. foot display, something on the wall caught my eye.
Yes, yes it is!
It was my very own Edward/R Patz silhouette that I offered the free jpeg of on this very blog, back in November of 2009! They had printed it and placed it in one of their frames and used it as decoration in a display inside an IKEA store.
I literally almost crapped myself! I just kept circling this 380 square foot display space like a crazed maniac; snapping photos of the wall with my phone. I mean in the grand scheme of things it's no big deal. Who knows who found it or even where. Maybe some designer from IKEA found it off this blog when she was looking for free artwork to grace the walls and blend with the black and white palette of the room. Maybe they got it off Google Image. Who knows. But there it was, my work being displayed in IKEA!
Now after I explained to my mother why I was circing this room like a vulture and squealing like a pre pubescent girl at a Justin Beiber concert. She asked if I was sure it was mine. I mean after all anyone really can put together a silhouette, especially of someone famous, whose image is everywhere on the web. However, I know my work and I had obsessed enough about those front two curls of hair and whether or not they looked natural, that there was no doubt in my mind.
Here's my original jpeg I offered to all readers:
Oh yeah, it's mine (with flip and a little bit of stretch, but still mine), and I shall be forever giddy!
Subscribe to:
Posts (Atom)


_edited-1.jpg)
_edited-1.jpg)
_edited-1.jpg)