Tuesday, April 19, 2011

Martha left out a few steps

So I stumbled across this cute crepe paper carrot idea on Martha Stewart.com and I thought it would be fun to make them for my daughter's preschool class as an Easter treat.


Crepe Paper Carrots How-To - Martha Stewart.com

1. Loosely wrap orange streamer to form carrot shape, making it thicker at top. Tuck in gifts as you work. Press end of paper down into top.

2. Fold green crepe paper in half across its grain. Download leaf template, and trace onto folded paper. Cut out; bunch up. Tuck leaves into carrot top; secure with dab of hot glue.

Look how easy and effortless it sounds right? Well as I got started I realized that Martha left out a few steps. So for the sake of all crafters I've decided to rewrite them so they're more accurate.


1. Scour every store in the city for orange crepe paper. Because most places only carry a select few colors and orange is not one of them.

2. Assemble your items to go inside of the carrots. I chose sidewalk chalk, mini bubbles and smarties candy.


3. Start wrapping. Okay, this seems like an easy thing right? Wrong. Just think back to high school when you were on the prom decorating committee. What's that? You weren't on the prom decorating committee? Okay, well then think back to high school when you TP'd that skank Sandy Collin's house because she was trying to steal your boyfriend (rotten eggs and flaming bags of dog poo are uneccessary). Anyway, my point is that when you start wrapping the crepe paper around things, it gets all kinked up because it's still attached to the roll right, and then you've got this huge mess of kinky crepe paper, which is not nearly as fun as it sounds.

Sure you could just cut off a length of it and start wrapping but then you never know if you're going to have enough and then it's still long so it starts getting all kinked up too and it's trailing on the floor and you're whipping it around and the cat thinks it's one hell of an awesome game and she inadvertently claws the crap out of your foot while chasing after it and you have to quickly explain to your 7 year old how Sh$%Fu@# is a small island in the carribean, and that he should never mention it's name to anyone because all the islanders hate America, and well it's just a social taboo.

4. So now that you've gotten the hang of it you start wrapping the actual items that will go into the carrot. You spend half an hour trying to figure out the best way to wrap them and then determine that there's no way you're going to get those Smarties in there so you just start eating them until your hands start shaking from the sugar rush. But that's okay because it distracts from the massive blood loss from your foot.


5. At some point you're going to wish that you were more adventurous in high school/college and wrapped your own, um "cigarettes" because that skill would come in handy for this project. If all else fails though you can go on Facebook and ask your cousin for some tips (we've all got one of those cousins don't we?).

Anyone got a light? I've got candy if we get the munchies later.

6. Now it's time to add on the green top. Fire up the glue gun and try to accomplish the task without burning the crap out of the tips of your fingers and having to explain to your 4 year old how "sonofab%^ch" is the Scandinavian word for "sweat socks".

7. Stand back and admire your work.


Wednesday, March 30, 2011

Thought Provoking Thursday

Do you ever wonder what it takes to be a yarn spokesperson? I mean besides the ability to wear a formal evening gown and touch TV screens to make letters appear on them?

According to my web research (which consisted of visiting the Lion Brand web site) Vanna is "America's favorite crocheter". Really? I don't recall voting on that. How exactly was that title determined?


Her Wikipedia page states that she's an "avid crocheter". Well I suppose that's something, but I'm an avid reader, and nobody's offered to name a library after me. I'm not a low level celebrity though, so maybe that's the distinction.


Why not shoot for a more well known celebrity spokesperson. Surely other famous people like to crochet or perhaps knit. And really the rules here seem pretty lax. How about someone who just occassionally wears something knitted? Works for me.


Whose yarn would you buy?

Thursday, March 24, 2011

Thought Provoking Thursdays

One of my new year’s resolutions this year was to blog more often. Okay, okay it hasn’t been so successful. How are your resolutions going? Let’s talk about that bag of mini Snickers you’ve got stashed in your glove box before you judge me alright?

Sorry, I get overly defensive when faced with completely imaginary criticism.

Anyway, I haven’t given up. I’m throwing myself into this goal with wild abandon. Okay, more like mediocre interest. I’ve been searching the web for inspiration and I’ve noticed a lot of blogs do what is called “Wordless Wednesday”. Basically they just throw a random picture up and boom, blog entry complete.

My first reaction was, “pfft, those lazy cheeky monkeys” (yes that’s really the phrase that formed in my head – I’m a joy at dinner parties). But then, I realized the genius of it all. It’s a guaranteed weekly blog entry and you don’t even have to type anything! If I photographically catalogued my extensive collection of plastic windup toys I’d have blog fodder for a year! (these ones below are the pride and joy of my collection. You're riveted, aren't you?)

But you guys deserve more, right? Of course you do. You come here for . . . umm, what do you come here for? Oh yeah, craft tutorials, insights and all around entertainment. I can’t just throw some random pictures up and call it good. Besides, I started writing this post on a Thursday and I’m a huge fan of alliteration so I had to come up with something else, and I did:

Thought Provoking Thursdays!

What’s that, you ask? It’s an opportunity for me to provide you with little nuggets of wisdom, moral dilemmas, mind blowing questions or statements that will really get your mind working. You know like; “If a bear craps in the woods . . . “ no, that’s not right. “If a tree falls in the forest and hits a bear who's taking a crap does it make a sound. . .” no, no “If a tree falls in the forest, is it cut up, made into pulp and then turned into Charmin toilet paper, that a bear then uses when he craps in the woods?”

Well, next week will be better. I promise. I’ll try to make them craft related too, such as; “If a bear were to make a toilet paper cozy would he knit it or crochet it?”

On second thought, maybe I should have just waited until next Wednesday.

Tuesday, March 15, 2011

Taste the Rainbow

Fall has always been my favorite season. But you know spring does have its advantages too.


Sweet, sugar coated marshmallow advantages!

My husband brought me these - illustrating exactly why I keep him around. Excuse me while I get my sugar rush on!

Tuesday, March 1, 2011

Little Wooden Cuteness

I absolutely love the internet, and not just because it allows me to see pictures of Alex Skarsgard in various states of undress whenever I wish . . . umm, but because it inspires me with lots of new crafting project ideas.
I came across this wooden peg matching and sorting dolls project on Gluesticks and it inspired me to make one of my own for my best friend's daughter's birthday. It was a great addition to the fabric doll I made her.

I couldn't find the cute little wooden doll pegs that Gluestick used but I found these that were a bit chunkier, which I thought would work better since the birthday girl is only 1 and these would be easier to grasp.

I also mounted the candle cups on a piece of wood. I figured this would make it easier to keep track of them all. The cups already had holes in the bottom of them so I literally just had to secure them to the piece of wood with screws.


I made sure to sand the edges of the wooden block also so that when she inevitably smacks her older brother over the head with it, it won't bruise nearly as bad.


I had a hard time keeping it away from my kids before I got it wrapped up.

I had so much fun making these that I was kind of sad to see them go too. I might have to find an excuse to make some more.

Saturday, February 19, 2011

Quick and Easy Fabric Doll tutorial

My best friend’s daughter is turning 1 this weekend. My kids call her Baby Kayla. Not “Kayla”, but “Baby Kayla” which is incredibly sweet. It might not be so sweet if they’re still calling her that when she’s 15, but for now we’re sticking with it.

Of course I had to make her gift. I struggled for quite a while trying to come up with something appropriate for her age and finally decided on a doll.

I wanted it to be soft and washable, with nice long sturdy arms and legs that she could drag her around by. Of course there are countless ways to make a simple fabric doll but this is what I came up with. The design is not purely original since I’ve seen dolls similar to this in stores, but I thought I’d share the pattern that I drew up and instructions on how to put her together.

Click Here for the pdf pattern

Supplies:

Fabric: I used cotton. You’ll need a color for the face/arms, one for the body and one for the legs. You’ll need minimal amounts. Perhaps a fat quarter for the body.

Fleece: just a decent sized scrap for the hair. You could also use felt.

Stuffing: I used polyester fiberfil

Marking pen or chalk: some pattern pieces will be drawn on the fabric and then sewn so you’ll need something to mark your fabric.

Fabric or permanent marker: I used this to draw on the face but you could embroider the face or use buttons or other options.

General sewing supplies: sewing machine, thread, scissors, etc.

Let’s start with the appendages. You’ll notice on the pattern that the arm and leg pieces do not have a seam allowance. This is because it’s much easier to simply draw the pattern shape on the fabric and sew directly on the line. This allows the shape of the hand/foot to be much more accurate than if you cut out the piece beforehand.

Place your arm/leg fabric right sides together and sew directly on the marked line. Leave the end open for stuffing. Then simply cut around your sewn pieces, turn them right side out and stuff with polyfil. The pieces don’t need to be stuffed all the way to the end since about an inch of the arm/leg will be sewn inside the body.

Now let’s start on the body. Before you cut out your body pieces you’ll want to piece the head fabric onto the body fabric. Cut pieces of each fabric that will be large enough to accommodate your pattern and then seam them together.

Then place your pattern piece onto the fabric, making sure to line up the line between body and neck on the pattern to your seam and cut out 2 body pieces.


Before we can sew the body together we’ve got to work on the hair and face. Cut out the hair pieces. Seam allowance is included in these pattern pieces. I chose fleece for my doll’s hair because the ends don’t unravel and I felt it would be softer and more durable than felt.

Lay the front and back hair pieces on the head and stitch down along the bottom edges. For the pig tails, cut out 4 pieces. Sew 2 pieces together for each pig tail and set those aside. We won’t need them until we get ready to put her together.

Options for your doll face are limitless. I chose to draw on a face using permanent marker. I used these Micron markers which work great on paper and fabric. If you’re going to draw on your face you might want to test your marker on a scrap piece of fabric to make sure it’s not going to bleed or do anything funky.

You could also embroider on your facial features, or cut them out of felt and sew them on. Some stores even sell iron-on doll faces which would be cute as well.

Make any other embellishments to your doll at this time. I made a little felt flower for the front of my doll. A little pocket would be cute too etc.

Now it's time to attach your doll's hair and arms. Place them where you think they look good and then turn them in toward the inside of the body. Cover the front of your doll with the back body piece and pin in place.

Sew around the body leaving the bottom open. Turn your doll right side out and stuff firmly. Don't stuff all the way to the bottom edge.


Turn the bottom edge of the fabric under and pin your legs in place. I closed the bottom seam on my machine. It was a little awkward but not impossible. You could hand sew the bottom opening closed if you prefer.

And, she's done!

As always, if you have any questions or if something isn't clear, leave a comment or shoot me an email at pinandpaper@q.com.

Friday, February 11, 2011

Who's Obsessed?

Owl's are really in now right? I've been trying hard to resist jumping on the bandwagon but recently I've just given up and embraced it. I've slowly started adding some hooters into my decor (and I'm not talking about women in orange hot pants who serve wings - much to the chagrin of my husband).

I found this set of brass ones at the flea market a few months ago for $6.

This planter was on sale for $2.50 at Hobby Lobby. I love how my spiky succulent looks like out of control head feathers.

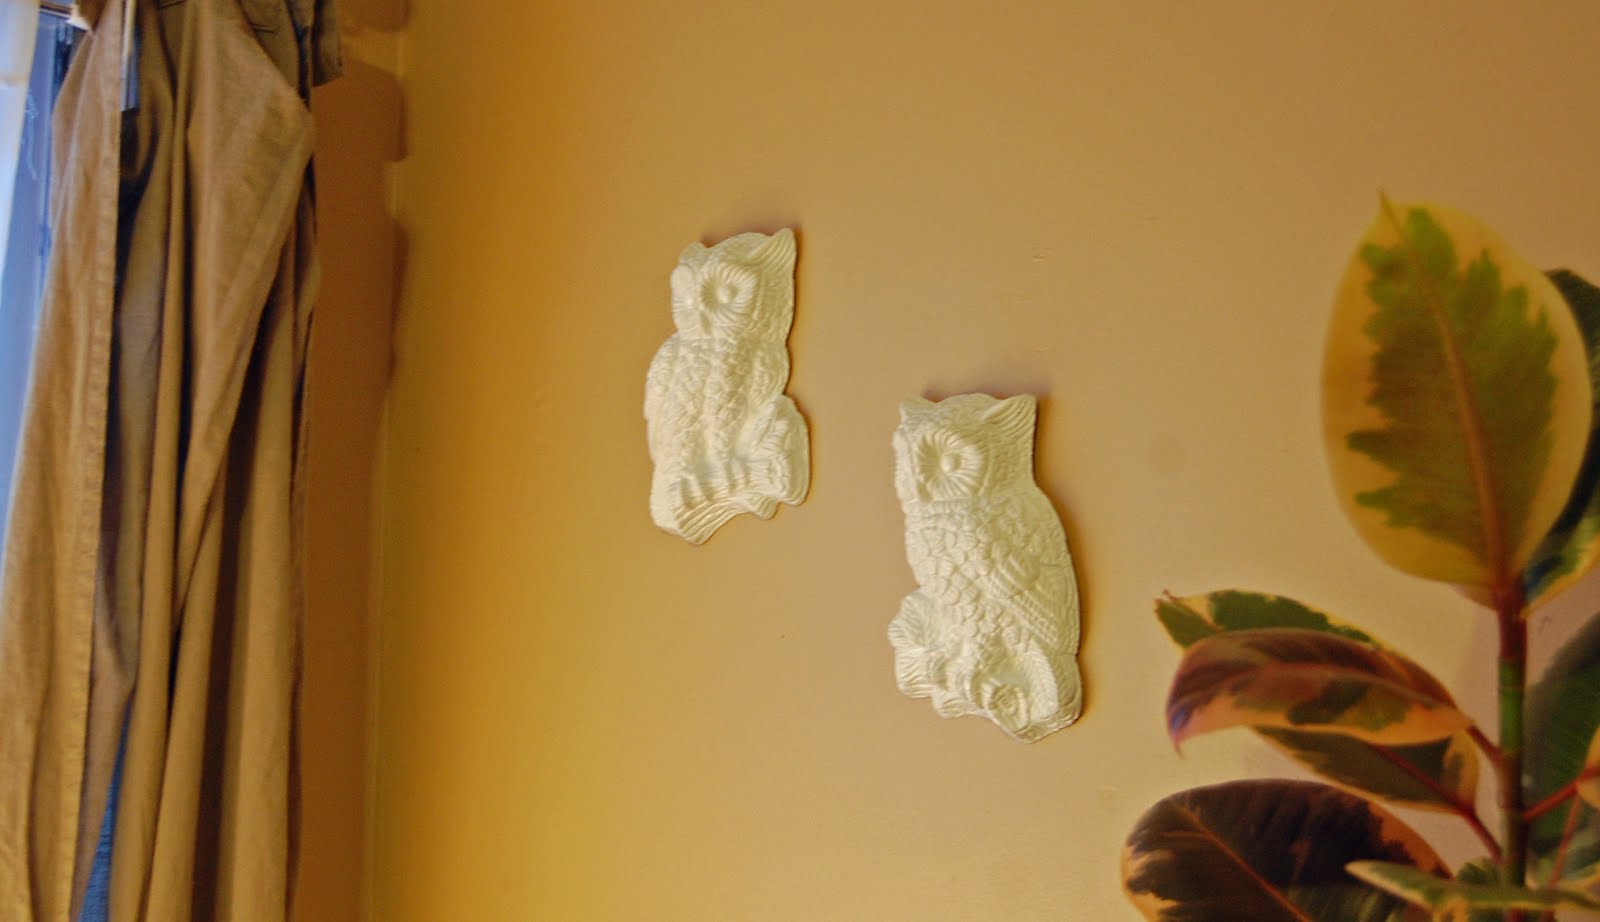
My most recent trip to the flea market netted me these gems for only 50 cents each!

They were a little too 70's for my style so I grabbed a can of Krylon fusion spraypaint (because I'm not sure what substance these things are made of) and gave them a quick coat of white.

They're a welcome addition to a blank space of wall in my living room. I don't know if I'm completely happy with them yet. I feel they need to be paired with some other things to really make them pop, but right now I'm enjoying them.

How about you? Have you embraced the owl revival?